FTL: Kicking ass with the Stealth Cruiser
Posted by JackSep 5
We are doing a series of posts on FTL and we hope you like them. If you want us to do more of this let us know in the comment or by mail at jack at onlinesgamestips.com
The stealth cruiser is a pretty fun ship to play with. While it lack shield its start with cloaking to compensate and if you manage it well it can have devastating effect. You can always buy the shield at a shop for 125 scrap.
Layout A
Unlock:
Defeat the right rebel in the Engi Fleet Discussion random event and head to the final quest marker and defeat the Mantis ship. The engi will deliver you the tech to build a new ship and unlock the stealth cruiser. For more info see the Engi Fleet Discussion random event.
Alternatively, if you defeat The Rebel Flagship with the Rock Cruiser that ship will be unlock.
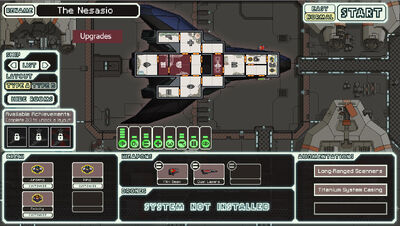
- Default name: The Nesasio
- Starting Crew: 3 Human
- Starting Augmentations:
- Starting Weapons:
- Starting Resources:
- 16 Fuel
- 0 Missiles
- 0 Drone parts
- Slots: 3 Weapon, 2 Drone (requires system)
- Cloaking system
I had a hard time figuring out this ship when I started. When you look closely this ship is all about timing. The lack of shield force you to be imaginative with your cloak and you weapon shots must be timed to maximum efficiency. When encountering a enemies. Either cloak right away to let your weapon charge or wait for him to shoot and at that exact moment cloak to dodge the shoot. With the dual beam take down the shield and let you mini beam either disable the weapon or drone. Upgrade you should try to get are the shield (sold in some stores for 125 scrap), a weapon to take down shield/weapon (bomb or missile) and upgrade cloak.
Layout B
Unlock: Unlock that ship by earning two of the three stealth cruiser achievements.
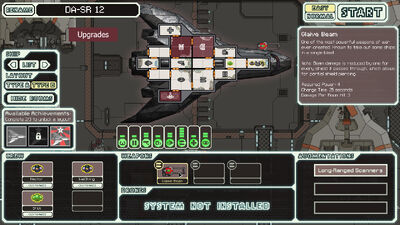
- Default name: DA-SR 12
- Starting Crew: 2 Human, 1 Zoltan
- Starting Augmentation:
- Starting Weapon:
- Starting Resources:
- 16 Fuel
- 0 Missiles
- 0 Drone parts
- Slots: 3 Weapon, 2 Drone (requires system)
- Cloaking system
This layout is super hard at the beginning, no shield, probably the best weapon in the game but it takes 25 second to charge and if your weapon system is hit it will completely discharges leaving you completely vulnerable (you basically have to run or you’re dead at that point). Drone are specially a problem, the beam drone is the worst it will tear your ship apart while you are try to charge your beam. Once the Glaive Beam is charge you will probably tear down most ship in the first 3-4 sector. It can do 9-15 damage (3 damage per room × 3-5 rooms) in a single shot (depending on the enemy ship layout) and has a good chance of lighting enemy rooms on fire. For the first few sector here what I did: first avoid asteroid field and probably ion storm too. When fighting other ship, hopefully they don’t have any anti-ship or beam drone, these can really be problematic. If they have boarder or drone (with anti-ship only) or hacking, it’s probably better to cloak right away. If they don’t have any of the 3 systems mention, wait for the first volley to be launch and cloak that should give enough time for the Glaive Beam to be completely charged and tear them apart. Hacking can be very useful to drain the shield, if you can get the weapon pre-igniter do it , it will give you an insane advantage and probably help you stream through the game without much worry for the first sector.
Layout C

Unlock: Get to sector 8 with layout B.
-
- Starting Weapons:
- Laser Charger (S) (special upgraded version, uses 1 less power, has .5 second cooldown reduction)
- Mini Beam
- Starting Drones:
- Shield Overcharger (special upgraded version, uses 1 less power)
- Anti-Drone
- Starting Resources:
- 16 Fuel
- 0 Missiles
- 16 Drone Part
- Clone Bay
- Slots: 3 Weapon, 3 Drone
- Starting Weapons:
That layout is actually really weird, there no shield likes the other Stealth Cruiser but there no cloak too. So what the point of this layout ? It as amore power efficient version of the Shield Overcharger, it’s also the only non-engi ship to possess a 3 space drone bay, giving greater versatility for Drones to be used, either defensively or offensively and finally it has a slightly improved version of the Laser Charger (S).
With this specialized Shield Overcharger and 2 Defense Drones Mark II (for a total of 6 power – the max) you could almost render a normal shield system useless – granting near-invulnerability to hacking, (non event) boarding, and a large number of projectiles, provided your drones are up as soon as battle starts and enemy weapon systems are targeted first. I would still try to grab the shield sub system since it’s doesn’t discharge when they attack you with beam weapon.
Cloaking it a great asset too, it can give you the time to put you drone up, let the Shield Overcharger build up the super shield and let the Laser charger to charge.
As this build is so drone-heavy, acquire a Drone Recovery Arm – and your defences become free! It can easily be swapped out towards the end of the game (Sector 6+) when you should have stockpiled a large number of drones.
No comments