In part 1, we managed to build your first organism, now let dial that to 11 and engineer the whole planet ecosystem.

Getting habitability

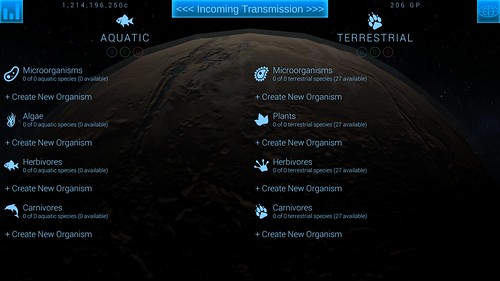
Since the requirement for habitability is just for terrestrial plant support, we can start by focusing on that instead of building both aquatic and terrestrial biosphere. Let’s assume you have enough species slot from you environmental building, the amount of species you need depends on how much support they will give. You can probably go around six microbial species for this for the moon/mars if you follow this guide. Keep in mind that it depends from planet to planet (or moons) since the moon need between 3- 10 and Mars 6-20 and since it’s support that needed not number of species, you might just have 2 species of on the moon and be fine (if they give 3-4.5 support each). Note since the skyfarm get rid of the biosphere requirement, you may use easy route if your goal is just habitability.

Get those microbes everywhere

Screenshot_20180719-083524

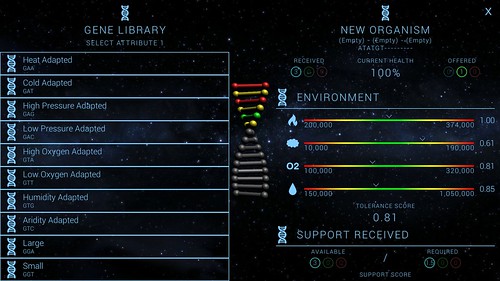
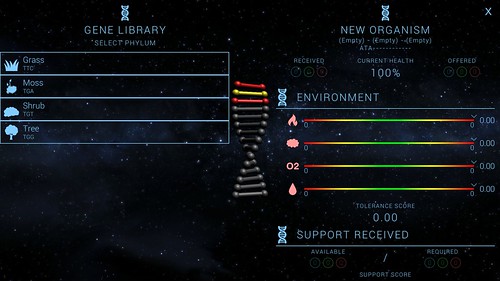
Our colonist will need plant and those plant will need microbial support. Good thing that in our previous entry we built a microorganism from scratch. Now we can do the same thing until we have enough support for our plant and some extra if you want those microbe that give credit. There are two main way to increase support. The first is by selecting a phylum that give support so either actinobacteria or fungus. Both give a base bonus of +50% to support. However species of the fungus phylum are less tolerant to arid environment (-15% tolerance low water). The second way if my selecting a gene attribute that boost support, for microorganism this mean either the Large gene (+50% support) and the Nitrogen Fixing. You can combine both ways them together and even stack attribute gene to give super organism that can give up to 10 of support. Since you cannot have organism with the exact same sequence you can mix large gene and nitrogen fixing to get more variety and still have a lot of support. Here, some example of the gene sequence you can build with high support that we repeat for each phylum.

Legend : L = large gene attribute NF = nitrogen fixing XX = low atmosphere tolerance, YY = low water tolerance (for fungus), AN = any

Actinobacteria = L-L-L, L-L-NF, L-NF-XX, L-L-AN, NF-L-AN (and if your feeling it L-NF-NF, NF-NF-XX)
Fungus = L-L-L, L-L-NF, L-NF-NF, LNFXX, L-NF-YY, L-L-AN, NF-L-AN (and if you’re feeling it L-NF-NF, NF-NF-XX)
Lichen = Same as actinobacteria, you might be able to pull off a L-NF-NF or NF-NF-XX because of the +10% tolerance bonus lichens has.
Protozoa = Same as actinobacteria

I don’t really like the using NF twice in a gene, but if you’re comfortable with it just go for it.
Honestly my first batch look like this:
Protozoa/actinobacteria/Lichen = L-L-L, L-L-NF, L-NF-XX, L-L-AN, NF-L-AN
Fungus: L-L-L, L-L-NF, L-NF-XX, L-NF-YY, L-L-AN, NF-L-AN
Total support: around 50+

You can even get 64 of support with one microorganism

Super Bug


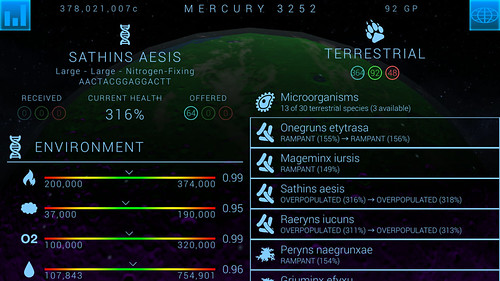
With this you will be getting multiple high support microorganism quickly, invest money in them to give them better odds of surviving.

Now you can unpause the game if you want to see if they survive and let them grow a bit.
Once your microbes are thriving let get some plant to get our habitability requirement.

If you have Lagrange Academy or a few culture points you’re willing to spare, you can go in the culture screen and add a few points to increase biomass.
This will increase the birthrate of all you species.
Screenshot_20181204-201309

Going Green

Gogreen
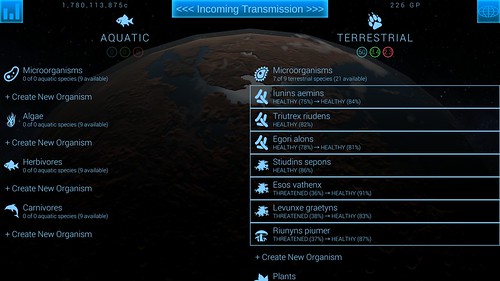
Now that we have a microbial ecosystem, let have some plant take advantage of it.
We’ll focus on terrestrial plant since they are the ones we need for habitability, but the principle work the same way for aquatic plant.

Screenshot_20180828-235751

Tree require more support, but give more support. However, the extra o2 can be a pain to manage.
Shrub have a +50% birthrate and require less support (-25% required) Moss +15% low temps resistance -15% low water tolerance are not super useful if you have the Soletta satellite since your temperature is usually just right.
Grass +2 pop grow&+1000c/min can be cost effective if you reinvest that 1000c/m in their health or just let them make money for you.
Usually I got with a mixture of tree and scrub maybe a few grass to start, if you’re feeling frisky about the extra o2 pumping in your atmosphere, you could always go for a mixture of scrub and grass initially.

Adding genes to your plant

Stacking large gene is not has good has with Microbes because now they will increase the support required too.

If you really want gene that give support, look at the fruit bearing gene first. Similar to large gene but it give an extra +2 to population.
You can mix them together to have four species that have +150% support.

Other interesting gene

Cash crop: +2000c/m -30 low water tolerance, this gene is a nice addition for plants, except maybe for moss since they already have -15% low water tolerance.
plant : Cash crop
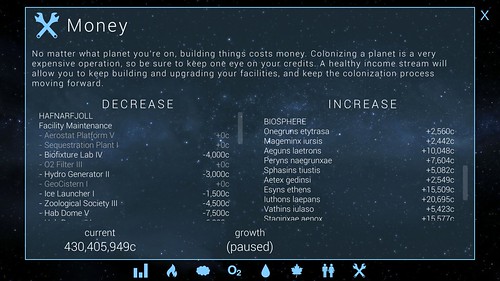
If you stack 3 fruit bearing genes together (or a mix of fruit bearing and large gene) you’ll get about +150 support (+200% for tree) but +150% support required. Which is about 14 support required per species (20 for tree) and 3.4 (4 for tree) support given.
Not sure my math is right, but that what I’ve observed creating my plants. You can add some cash to increase their health and remove it once they get over 100%.

Since you can mix the Large (L) gene with the fruit bearing gene (FB) you can get 4 combination with +150%.
L-L-L, L-L-FB, L-FB-FB, FB-FB-FB

WIth 4 plant type you get up to 16 species with high support, but beware of the support they need from your microbes however.

Side note: In order to give the maximum of support a species need to be health at 100% or more.

Create a few gene to get to your 10 or 20 of support for habitability and you are now habitable.
That mean you need about 3 species on the moon, 5-6 on mars to be habitable if you create high support plant like I’ve explain here.
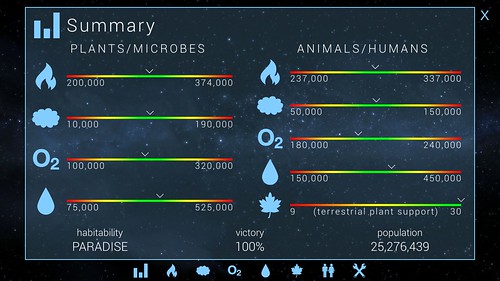
Road to Paradise

Paradise is actually simple to acheive. You just need to be within 5% of all the goals and have enough support from your plant to be way right.
Screenshot_20181204-201144 

If at the beginning of the game you chose the biosphere option instead of biomass this guide is for you. If not, go start a new game with it and we’ll be waiting for you.

If it’s your first time with the biosphere or you got burn buy it, this guide will help you get your head around the basic.

Note if you just want your planet to be habitable might not need to border with biosphere if the skyfarm is built. 

Step 1:
First even if you have the biosphere you need to make your planet at least habitable for plants and microorganism. So get your temperature & atmosphere right, sprinkle some o2 and water and you’re good to go. Be sure your four metric are stable before starting playing around your biosphere. You could always try to create an organism that has better resistance to your planet problems, by giving it gene with higher tolerance to these problems or making them extremophile. However it’s easier to wait and create them in a stable environment.

Step 2:
Note: this step can actually start while you’re still in step 1.

While your adjusting your planet, research some biomass aquatic & terrestrial building (Like Reef institute & Zoological Society) and build some. If you only want to get to victory you can only build terrestrial building since it’s the one counted in the victory screen.

Step 3:

Once the planet metric are stables and you have enough biosphere infrastructure to support at least nine species you can start playing around biosphere menu.

How support work
Screenshot_20180829-001605

What is support? In nature, each organism lives with support of other, carnivore need herbivore for food, the herbivore need plant to eat, plant need microorganism to enrich the soil with nutrient. This cycle of life is represented through support in the game. In the circle in blue on the left, its represent the amount of support your microorganism give. The green circle in the middle is the amount of support your plant give and the red circle on the right is the amount of support your animal give.
When you create an organism, this organism will receive (“consume” if you will) support from the previous group and offer support depending on the type of organism and the gene selected. Microorganism don’t require support so you can ignore the +50% support required modifier when creating them. Be sure to have enough support offered in one group before making organism from the next group. The base number of support each organisms give is 1 before modifier (seem to be 2 for microbe)
Note that to achieve victory you only need a bit less that 20 of terrestrial plant support (on mars, 10 for the moon), so if you’re in a hurry you can only focus on getting these 20 of plant support.

Creating your first organism

Screen select Microorganism type.

Once you selected what group your organism is going to be, you can now select the phylum gene of your organism. Let’s pick Lichen for this example since it’s our first organism and lichen offer better base environment that the others with its +10% bonus to all tolerances.

Screenshot_20180829-000124

Now that we chosen our phylum we can now pick three gene that will determine the base attribute of our organism. This is probably the best part of the biosphere, creating your organism. Do you want it to survive at all cost or allow it to generate a lot of support for higher up the food chain. Or maybe you want it to proliferate like crazy and give out O2 at the same time. Or actually make your planet some extra credit. You can all do that, for now let’s build a simple organism that we want to survive on Mars with our current temperature, pressure, o2 level and water level.

misunderstood-bacteria-v-2-png_orig

Since they can ignore support required, the Large Gene is very interesting since its give an extra 50% supports and no drawback. You can even pick it three times if you want since attribute gene can stack, but let’s pick it once for this example. Another interesting gene unique for microorganism is the Nitrogen fixing gene. Its give 50% supports, but reduce resistance to low pressure by 30%. We could counterbalance that drawback by giving it the resistance to low pressure gene (+30% tolerance low pressure -30% tolerance high pressure). Since our pressure is high and stable and lichen already get a +10% to all tolerances, we will add another gene instead like one that increase the birthrate so our lichen can proliferate. The High metabolism gene is probably our best bet since it provides a boost of 100% birthrate and its drawback is that it need 50% support, but since our lichen doesn’t need support we can ignore it. Other viable options are either the Nocturnal gene (+100% birthrate -30% low temperature tolerance) or the Invasive gene (+100% birth rate -2000 credit/m). Infectious is another option, but it reduces your population grow and Airborne would be nice, but it has a -30 % tolerance to low pressure and since we already got -30% from Nitrogen fixing we don’t want them to stack together.
Now name your organism and you’re good to go. Now that you know have built your first organism you can start playing around and build a whole ecosystem.

Other tips that can help your biosphere creation and that your species survives.

  • Invest money on each species to increase their health and help them survives.
  • You can play around the biosphere menu and create your species while the game is paused.
  • The culture modifier that usually help the biomass will help all your species birthrate instead.

Stay tuned for part 2: building a whole ecosystem and optimizing your biosphere to make your planet habitable.

Screenshot_20180715-123648
Mars has a cold climate, with almost no atmosphere and zero oxygen.
But because it has frozen water at its poles, it makes it a prime candidate for terraforming.
Raising the temperature of the planet melts the ice and causes sea levels and water levels to go up.
However, there is not enough water in the ice caps to form an ocean.
Oxygen and Pressure will have to be made artificially, and you need a boost for the water, so be sure to research everything about water as well.

Starting Stats:

Temperature: 218,027mK (28 retained by atmosphere)
Pressure: 600Pa
Oxygen: 1ppm
Water: 17,615cm (82,384 frozen in ice)
Biomass: 0

Disclaimer

Before we start keep in mind that depending on what setting you pick, the facilities won’t have the same effect.
Example: The hab dome give biomass when you selected biomass at the start of the game, but give oxygen instead when your playing with biosphere on.

Most of this guide is for playing normal with biosphere, but they will mostly hold true for other difficulty.  I don’t recommend playing at the easy level because you won’t have access to those sweet satellite.

Phase 1: Let’s start

Horizon or Son of Hephaestus

Choose either Horizon or the Son of Hephaestus has starting faction, you need your buildings to build fast and your mines to overflow with money (credits). You can later modify all the value in the culture section with using culture point once you build the Lagrange Academy satellite.

Start getting the Iron and silver research to start mining them right away.

Then go build your free colony and an outpost.

Pick a high elevation for your colony. For the outpost, its depend on your long game. I usually build them in altitude, but sometime I build some near expected sea level. Why ? So that in the late game the rising water will destroy them preventing me from paying to close them.

Go to your outpost, you should have around 3M now.

Build 4 silver mine and maybe 1-2 iron if you can’t get more silver in the green-yellow range when you scan. Increase the level of all the mines to 3 or 4. This way you will get more credits per minute and the mine will deplete faster. A depleted mine is a good thing because you can remove it for cheap and build another mine of better mineral (like Palladium) at a lower price.

Here you probably spent all your money, but generating around 50k/minutes (25k if you didn’t watch ads for the 200% boost)

When your cash is high enough you can either start researching Hab Complex or children creche.

I usually go for the children creche to rush to get the spaceport. The spaceport is probably the best add-on you can add to your colony. Its generate credits, its allow you to build super satellite, colonize mars moon and it’s drawback is actually a plus on mars since it’s slowly increase your pressure.

Hab complex is to rush to hab dome which generate water and biomass if your playing with biomass on and oxygen and water if your playing with biosphere.

Why rush for the Hab dome then if spaceport is better ?

I prefer getting the spaceport first, but the hab dome is really useful to have quickly too, it will allow you to have more population which means more facilities can be built on all you colonies and it will increase your culture point faster.

While your researching you can take a break and come back later or use genesis point to rush research or/and get more credits.
Once you comeback you might have enough to research palladium and build another outpost, in that case do it but mine only palladium and maybe 1-2 silver it you don’t get enough good palladium spot.
Research transport and wait a bit again. Once it’s done (or rush with point) you can research the spaceport

Once you finish the starport research build one in your colony and research hab complex to get a hab dome ASAP.
You can build multiple startport in your colony combine with some Hab dome to generate more population grow.
Once your got the Hab Complex and the Hab dome research, we can start to be creative.

Phase 2: Let’s fix Mars

Barren Mars
Option 1: let go all in on the mining. Then we terraform Mars.

Here what you want is to get all your mining research and build the Orbital Surveyor satellite. It’s half price if your playing Horizon.

Its take almost a day to build so you have to be patient, but once it’s built its allow you to see where the mineral are the most abundant and getting your outpost to generate 250k/m each.

With all that money you can build all the satellite and upgrade you colonies and jump to option 2.

Option 2: Let focus on terraforming Mars, we’ll figure out the money part at the same time. 
You can enter in the lets terraform the planet phase.
Since Hab dome are generating oxygen and water and spaceport generate pressure, you might start researching facilities that counter those increase.
Temperature is not a issue if you in normal or expert mode. The Soletta satellite will take care of it for you, but water will become problematic once the temperature increase.

Screenshot_20180715-083936
Pressure don’t grow that fast either, but since you might build more spaceport (since they generate money too) it might not be a issue at that point.
Your research in the background should be to reduce 1-water 2-oxygen 3-pressure and the occasional biosphere facility, if you’re playing with it. If your playing with biomass on, the Hab dome will do the work for you to increase biomass.
Have some water reducing facilities in your colonies and start building the Soletta. You can check how much water is frozen in the icecap in the water screen (top left)
Now build facilities that will tend your increase towards 0 so once your at you sweet spot nothing increase anymore. At this point Mars should allow microbial and plant life.

Phase 3: Microbial and plant life.

If your using biomass this part is actually really easy. Use your sweet cash you made earlier and build the sky farm satellite and your colonies won’t use all that biomass and it will grow to the amount needed to. It’s even half price if your playing with the son of Hephaestus.
If you’re using the biosphere I will write a guide on that topic, but here are the basic.

Microbial life


misunderstood-bacteria-v-2-png_orig

Microbial life don’t need support so you can use gene that say need 50% more support without the penalties, which allow you to build microbe that give more support for the next group.
If your planet is not stable yet you should play around the biosphere yet, but it you really want to you can always create super resistant life form while you’re stabilizing your planet.
However, these lifeforms tend to give less support for the next group. I will write more about it in my biosphere guide.

Plant Life

If you want to “finish the game” you only need to get to 2 plant support to make your planet habitable. So focus on getting these kinds of plants. The trick is to build many type of plant that give a lot of support.

Phase 4: Mars is habitable.


You’re almost there, with all your spaceport your colonies will be booming. With that population explosion u should have enough culture point to declare independence.
Once you do you will have a victory screen and it will unlock Venus.
You can continue to play, but if you leave Mars I recommend that you to pause the game. If not at least be sure that water, pressure and oxygen are growing at +0.
This will prevent Mars from growing while you are colonizing other planet, and it will prevent it from going barren again.

Other tips:

  • If your using Horizon, you might want to increase the research speed because it’s pretty abysmal in the beginning.
  • Note if your playing with biomass, try getting the sky farm satellite once you are in the habitable phase or just before. This will prevent your colonies to use all your biomass.
  • Except for easy mode, you can basically ignore the temperature since you will just need to build the Soletta satellite to fix it.
  • Resit the urge to spend culture point and since with this build you will be overflowing with money always refuse the credits in exchange reducing your independence movement.
  • Like we said in phase 4, be sure that water, pressure and oxygen are growing at +0.

Let me know if you like this long format walkthrough. I might make one for Venus in the future.


Huniecam-Studio-SFW

You are tired of not being able to get the beautiful “censored” diamond trophy, all your girl are stock with only their boring starting clothes ?
This is the guide for you.

HunieCam has been out for awhile and my guide been sitting in my draft since then. So here it is my ULTIMATE guide to your cam empire, It’s not perfect but it’s got me to diamond all the time.

Early game

Your 3-4 first girls

Try to get your first 3 girls try to have a synergies between them. One of my playthrough I’ve started with Katiana (Latina, thick ass) then I got Sarah (chubby, thick ass, 3 of style) and my third girl was Beli (Asian, chubby, 2 talent). I would rise Sarah style and make here do photo shoot while the 2 others would be either raising theirs talent or doing cam show for money.

kyanna beli sarah

Note that you don’t have to pay the girls if they’re not in your right “roster”, so don’t be afraid to recruit more girl if you want to have a good synergy.

Don’t rush your skills to 5 at the start, when a girl gets to 5 she cost way too much at the beginning. You can mitigate the raise if you only raise on skill at the expense of the other skill. One way this can work is where your girl complement one another, the style girl does photo shoot to increase fan and the others high talent girl do cam show likes explained previously.

The Errand Girl

YAY ! Let's go shopping!

Girls love to shop so make one of your girl doing just that. Your fourth girl is probably be the errand girl, depending on who you get you might get her earlier.

She will probably stay the errand girl the whole game (and probably you will have two of them later if you want to farm those condoms). You want here to have to lowest possible skill so she doesn’t cost a dime. A 1 style, 1 talent girl is perfect and don’t raise her stats.  This girl will takes care of the recruiting, getting sex toys in the adult shop, buy booze and cig. And give her the cart has soon you get it.

Early upgrade

One of the key upgrade you need to grab early is the item upgrade. The first item will probably be the subscribe pillow so all your girl will recruit fan will doing a cam show and the cart for the errand girl.

Mid and late game

pile of cash

You’re making a lot of money now you don’t have to worry too much about going in the red anymore and you should be getting most of you fan via advertising now.

At this point in the game it’s start to be really interesting to get girl that have already high skills, like Jessies (5 talent) and Marlena (5 both). So when you recruit them you can put them to work right away.  All your girls should have the skill talents at 5 and probably style too (less important since you get most of your fan via advertising, but talent is crucial)

Your errand girl(s) should be keeping booze and cig well stacked up and getting sex toy in the adult store like the subscribe pillow to all your cam girls and at least one common fetish item for most of your girls. I personally  like to run with two errand girl in mid game to get all the item I need and stack some condom at the same time. I give these girls some coke so they get these stuff faster, you can swap one of the girl in late game when you are well equipped.

Girls, Items, ads

Items that are worth getting fast are the subscribe pillow and the shopping cart. Like explained previously try to get the subscribe pillow to every girl you can (except the errand girl). Once you’ve done that you practically don’t need to do photo shoot anymore and can skip these upgrade.

When buying some sex toy try to buy fetish item that other girl has and that already have a huge following. The girl with that item will gets all the fan for that fetish and become quickly a cash machine.

Example if you have a girl with a furry item, each time she does a photo shoot or cam show with the subscribe pillow she will get fan for that item. Since fan are shared all the fan for “furry fetish” will go to all your other girl with the time. Since each girl gets fan like this they will get the fan from one another creating a snowball effect.

Single use items: Coke, pot, condom

condom

Coke and pot are great for you errand girl keeping them longer in the store instead of the spa. Condoms are a great way to make money it’s prevent having diseases when a girl is escorting. Stack them up and when you got a new girl with high talent and a lot of fan or if you are switching fetish item of one of you girl, send her to the sleazy hotel with a condom first so she will make you bunch of quick cash before putting her back on cam.

Stress & addiction

Girl without addiction tend to be easier to manage (less need to go to the store) but stress faster. Note my best playthrought my best girl was Audrey (addicted to both booze and cig)

Ads

vintage_ads_by_thalesrm

Always check ads, you can grow really quickly with them. Try grabbing fan you already have a girl with the corresponding fetish or that you already have toys for. Later it might worth it the shuffle your toys and girls when some ads are giving you a lot of fan for a particular fetish.

end